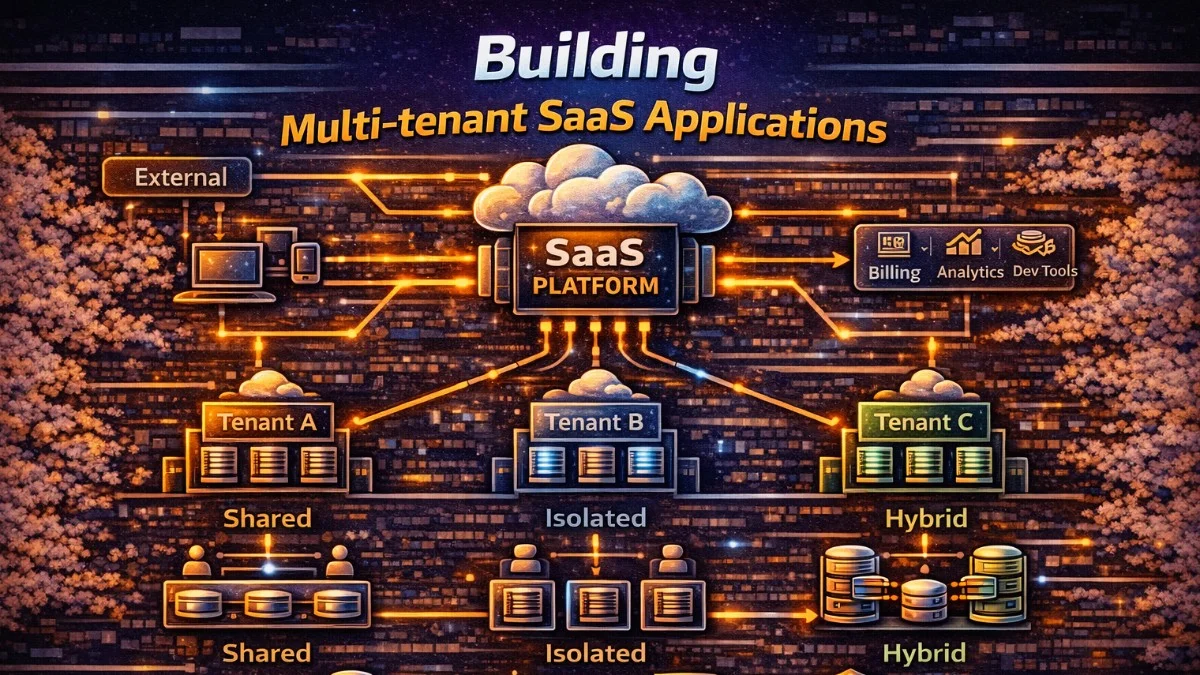
Multi-tenancy allows a single application instance to serve multiple customers (tenants) while keeping their data isolated. This architecture is fundamental to SaaS applications. This guide covers multi-tenancy patterns and implementation strategies in Laravel.
Multi-Tenancy Models
Single Database, Shared Tables
All tenants share tables with a tenant_id column:
This is the simplest approach, where every tenant's data lives in the same tables, distinguished only by a foreign key. It's easy to implement but requires careful attention to query scoping.
┌─────────────────────────┐
│     users table         │
├─────────────────────────┤
│ id │ tenant_id │ name   │
├────┼───────────┼────────┤
│ 1  │ 1         │ Alice  │
│ 2  │ 1         │ Bob    │
│ 3  │ 2         │ Carol  │
└────┴───────────┴────────┘
Pros: Simple, efficient resource use Cons: Risk of data leaks, harder compliance
Single Database, Separate Schemas
Each tenant has their own schema/prefix:
Schema-based isolation provides stronger boundaries while keeping all data in one database. Each tenant gets their own set of tables within the same database.
tenant_1.users
tenant_1.orders
tenant_2.users
tenant_2.orders
Pros: Better isolation, easier backups Cons: More complex migrations, schema management
Separate Databases
Each tenant has their own database:
Complete database separation offers the strongest isolation, often required for compliance with regulations like HIPAA or SOC 2.
tenant_1_db → users, orders
tenant_2_db → users, orders
Pros: Complete isolation, easy compliance Cons: More infrastructure, harder queries across tenants
Tenant Identification
Subdomain-Based
Subdomain identification is popular because it provides a clear visual cue to users about which tenant they're accessing. Each customer gets their own subdomain.
acme.myapp.com → Tenant: ACME
globex.myapp.com → Tenant: Globex
The middleware extracts the subdomain and resolves it to a tenant record. This runs early in the request lifecycle to establish tenant context.
// Middleware
class IdentifyTenant
{
    public function handle(Request $request, Closure $next): Response
    {
        $subdomain = explode('.', $request->getHost())[0];

        $tenant = Tenant::where('subdomain', $subdomain)->first();

        if (!$tenant) {
            abort(404, 'Tenant not found');
        }

        app()->instance(Tenant::class, $tenant);
        config(['database.default' => "tenant_{$tenant->id}"]);

        return $next($request);
    }
}
The app()->instance() call makes the tenant available throughout the request via dependency injection, while the config change switches the default database connection.
Domain-Based
Custom domains are common for enterprise customers who want their own branding. This requires more DNS configuration but provides a whitelabel experience.
acme.com → Tenant: ACME
globex.com → Tenant: Globex
Path-Based
Path-based tenancy works well for APIs and simpler applications without subdomain requirements. It's easier to set up but less visually distinct.
myapp.com/acme/* → Tenant: ACME
myapp.com/globex/* → Tenant: Globex
Header/Token-Based (APIs)
For APIs, tenant identification often comes from headers or JWT claims. This is common when building APIs for mobile apps or third-party integrations.
X-Tenant-ID: acme
Authorization: Bearer <token_with_tenant_claim>
Laravel Implementation
Global Scopes
Automatically filter queries by tenant:
Global scopes ensure that every query is automatically filtered by tenant, preventing accidental data leaks. This is the foundation of shared-table multi-tenancy and requires no changes to your existing queries.
// app/Models/Traits/BelongsToTenant.php
trait BelongsToTenant
{
    protected static function bootBelongsToTenant(): void
    {
        static::addGlobalScope('tenant', function (Builder $builder) {
            if ($tenant = app(Tenant::class)) {
                $builder->where('tenant_id', $tenant->id);
            }
        });

        static::creating(function (Model $model) {
            if ($tenant = app(Tenant::class)) {
                $model->tenant_id = $tenant->id;
            }
        });
    }

    public function tenant(): BelongsTo
    {
        return $this->belongsTo(Tenant::class);
    }
}

// Usage
class Project extends Model
{
    use BelongsToTenant;
}

// Queries automatically scoped
$projects = Project::all(); // Only current tenant's projects
The creating event ensures new records are automatically assigned to the current tenant. You never have to remember to set tenant_id manually.
Tenant Service
A dedicated service class provides a clean API for tenant management and configuration. It centralizes all tenant-related concerns in one place.
// app/Services/TenantService.php
class TenantService
{
    private ?Tenant $current = null;

    public function set(Tenant $tenant): void
    {
        $this->current = $tenant;

        // Set database connection if using separate databases
        $this->configureDatabaseConnection($tenant);

        // Set filesystem disk
        config(['filesystems.disks.tenant' => [
            'driver' => 'local',
            'root' => storage_path("app/tenants/{$tenant->id}"),
        ]]);

        // Set cache prefix
        config(['cache.prefix' => "tenant_{$tenant->id}"]);
    }

    public function current(): ?Tenant
    {
        return $this->current;
    }

    private function configureDatabaseConnection(Tenant $tenant): void
    {
        config([
            "database.connections.tenant" => [
                'driver' => 'mysql',
                'host' => $tenant->db_host,
                'database' => $tenant->db_name,
                'username' => $tenant->db_user,
                'password' => $tenant->db_password,
            ]
        ]);

        DB::purge('tenant');
        DB::reconnect('tenant');
    }
}

// Service Provider binding
$this->app->singleton(TenantService::class);
Registering as a singleton ensures the same tenant context is maintained throughout the request lifecycle.
Middleware Stack
The initialization middleware ties everything together, identifying the tenant and configuring the application accordingly. It runs early in the middleware stack.
// app/Http/Middleware/InitializeTenancy.php
class InitializeTenancy
{
    public function __construct(
        private TenantService $tenantService
    ) {}

    public function handle(Request $request, Closure $next): Response
    {
        $tenant = $this->identifyTenant($request);

        if (!$tenant) {
            return redirect()->route('tenant.not-found');
        }

        $this->tenantService->set($tenant);

        return $next($request);
    }

    private function identifyTenant(Request $request): ?Tenant
    {
        // Subdomain identification
        $host = $request->getHost();
        $subdomain = explode('.', $host)[0];

        if ($subdomain === 'www' || $subdomain === config('app.domain')) {
            return null;
        }

        return Tenant::where('subdomain', $subdomain)
            ->where('is_active', true)
            ->first();
    }
}
The is_active check allows you to disable tenants without deleting their data, useful for suspended accounts or migration scenarios.
Database Patterns
Migrations for Multi-Tenant
Separate your migrations into central (shared across all tenants) and tenant-specific categories. This keeps your migration structure organized and clear.
// Central database migrations (tenants table, users, etc.)
// database/migrations/

// Tenant-specific migrations
// database/migrations/tenant/

class CreateProjectsTable extends Migration
{
    public function up(): void
    {
        Schema::create('projects', function (Blueprint $table) {
            $table->id();
            $table->foreignId('tenant_id')->constrained()->cascadeOnDelete();
            $table->string('name');
            $table->timestamps();

            $table->index(['tenant_id', 'created_at']);
        });
    }
}
The composite index on tenant_id and created_at optimizes the most common query pattern: listing a tenant's records in chronological order.
Running Tenant Migrations
For separate database architectures, you need to run migrations against each tenant's database. This command iterates through all tenants and applies migrations.
// Artisan command for tenant migrations
Artisan::command('tenants:migrate', function () {
    Tenant::all()->each(function ($tenant) {
        $this->info("Migrating tenant: {$tenant->name}");

        Artisan::call('migrate', [
            '--database' => "tenant_{$tenant->id}",
            '--path' => 'database/migrations/tenant',
        ]);
    });
});
In production, consider running migrations asynchronously or during off-peak hours to avoid impacting tenant performance.
Queues and Jobs
Tenant-Aware Jobs
Background jobs need tenant context too. Serialize the tenant with the job and restore it when processing to ensure database queries are properly scoped.
class ProcessTenantReport implements ShouldQueue
{
    use SerializesModels;

    public function __construct(
        public Tenant $tenant,
        public Report $report
    ) {}

    public function handle(TenantService $tenantService): void
    {
        // Set tenant context for job
        $tenantService->set($this->tenant);

        // Now all queries are scoped to tenant
        $data = Project::where('status', 'active')->get();
        $this->generateReport($data);
    }
}
Because SerializesModels stores the tenant's ID rather than the full object, the job will use fresh tenant data when it runs.
Queue Isolation
For stronger isolation, route tenant jobs to dedicated queues. This prevents one tenant's workload from impacting others and provides better resource control.
// Dispatch to tenant-specific queue
ProcessTenantReport::dispatch($tenant, $report)
    ->onQueue("tenant_{$tenant->id}");

// Or use connection per tenant
ProcessTenantReport::dispatch($tenant, $report)
    ->onConnection("tenant_{$tenant->id}_redis");
Caching Strategies
Tenant-Prefixed Cache
A cache manager wrapper ensures each tenant's cached data stays separate. This prevents data leakage through the cache layer.
class TenantCacheManager
{
    public function __construct(
        private TenantService $tenantService
    ) {}

    public function get(string $key, mixed $default = null): mixed
    {
        return Cache::get($this->prefixKey($key), $default);
    }

    public function put(string $key, mixed $value, int $ttl = 3600): void
    {
        Cache::put($this->prefixKey($key), $value, $ttl);
    }

    public function forget(string $key): void
    {
        Cache::forget($this->prefixKey($key));
    }

    private function prefixKey(string $key): string
    {
        $tenantId = $this->tenantService->current()?->id ?? 'global';
        return "tenant_{$tenantId}:{$key}";
    }
}
Using the tenant ID as a prefix is simpler than managing separate cache stores per tenant.
Cache Isolation
For complete isolation, configure separate cache stores and switch between them based on tenant context. This provides stronger guarantees but requires more configuration.
// config/cache.php
'stores' => [
    'tenant' => [
        'driver' => 'redis',
        'connection' => 'tenant',
        'prefix' => '', // Set dynamically
    ],
],

// In TenantService::set()
config(['cache.stores.tenant.prefix' => "tenant_{$tenant->id}"]);
Cache::store('tenant')->flush(); // Clear on tenant switch
Be cautious with flush() during tenant switches - in a web request context, this could cause issues. It's more appropriate during testing or maintenance.
File Storage
Tenant-Scoped Storage
Keep each tenant's files in isolated directories or with isolated prefixes in object storage. This ensures tenants cannot access each other's files.
class TenantStorageService
{
    public function disk(): Filesystem
    {
        $tenant = app(TenantService::class)->current();

        return Storage::build([
            'driver' => 's3',
            'bucket' => config('filesystems.disks.s3.bucket'),
            'root' => "tenants/{$tenant->id}",
        ]);
    }

    public function store(UploadedFile $file, string $path): string
    {
        return $this->disk()->putFile($path, $file);
    }

    public function url(string $path): string
    {
        return $this->disk()->url($path);
    }
}
Using a root prefix in S3 provides logical separation while keeping all tenants in one bucket for simpler management.
Testing Multi-Tenant Applications
Test Setup
Create helper traits to make tenant context easy to establish in tests. This reduces boilerplate and ensures consistent test setup.
trait InteractsWithTenants
{
    protected Tenant $tenant;

    protected function setUpTenant(): void
    {
        $this->tenant = Tenant::factory()->create();
        app(TenantService::class)->set($this->tenant);
    }

    protected function actingAsTenant(Tenant $tenant): self
    {
        app(TenantService::class)->set($tenant);
        return $this;
    }
}

class ProjectTest extends TestCase
{
    use InteractsWithTenants;

    protected function setUp(): void
    {
        parent::setUp();
        $this->setUpTenant();
    }

    public function test_projects_are_scoped_to_tenant(): void
    {
        $tenantProject = Project::factory()->create();
        $otherTenant = Tenant::factory()->create();
        $otherProject = Project::factory()->create(['tenant_id' => $otherTenant->id]);

        $projects = Project::all();

        $this->assertCount(1, $projects);
        $this->assertTrue($projects->contains($tenantProject));
        $this->assertFalse($projects->contains($otherProject));
    }
}
This test verifies the core promise of multi-tenancy: one tenant cannot see another's data.
Cross-Tenant Testing
Test scenarios where admins or super-users need to access data across tenants. These tests ensure administrative features work correctly.
public function test_admin_can_access_all_tenants(): void
{
    $tenant1 = Tenant::factory()->create();
    $tenant2 = Tenant::factory()->create();

    Project::factory()->for($tenant1)->count(3)->create();
    Project::factory()->for($tenant2)->count(2)->create();

    // Admin bypasses tenant scope
    $admin = User::factory()->admin()->create();
    $this->actingAs($admin);

    $projects = Project::withoutGlobalScope('tenant')->get();

    $this->assertCount(5, $projects);
}
The withoutGlobalScope method explicitly bypasses tenant filtering, which should only happen in specific admin contexts.
Security Considerations
Preventing Data Leaks
Defense in depth means checking tenant ownership at multiple levels, not just relying on global scopes. Add explicit authorization checks.
// Always validate tenant ownership
public function show(Project $project): ProjectResource
{
    // Route model binding already uses global scope
    // But add explicit check for defense in depth
    $this->authorize('view', $project);

    return new ProjectResource($project);
}

// Policy
public function view(User $user, Project $project): bool
{
    return $user->tenant_id === $project->tenant_id;
}
The policy check catches cases where global scopes might be bypassed accidentally or through code changes.
Super Admin Access
Super admins often need to impersonate tenants or access data across all tenants. Build this capability carefully with proper auditing.
trait BelongsToTenant
{
    protected static function bootBelongsToTenant(): void
    {
        static::addGlobalScope('tenant', function (Builder $builder) {
            $tenant = app(TenantService::class)->current();

            // Skip scope for super admins
            if (auth()->user()?->isSuperAdmin()) {
                return;
            }

            if ($tenant) {
                $builder->where('tenant_id', $tenant->id);
            }
        });
    }
}
Super admin bypass should be logged and audited. Consider requiring explicit opt-in rather than automatic bypass.
Packages
Stancl/Tenancy
Full-featured multi-tenancy package:
Stancl's tenancy package handles most multi-tenancy concerns out of the box, including automatic database switching, queue awareness, and event hooks. It's a great choice for rapid development.
composer require stancl/tenancy
php artisan tenancy:install
// Automatic tenant identification
// Automatic database switching
// Queue tenant awareness
// Event hooks for tenant lifecycle
Spatie/Laravel-Multitenancy
Lightweight, flexible approach:
Spatie's package provides building blocks rather than a complete solution, giving you more control over implementation details. It's ideal when you need customization.
composer require spatie/laravel-multitenancy
// Custom tenant identification
// Task-based tenant switching
// Full control over implementation
Choose based on your needs: Stancl for a batteries-included approach, Spatie for maximum flexibility.
Best Practices
- Defense in depth - Multiple layers of tenant isolation
- Test isolation - Verify data doesn't leak between tenants
- Audit logging - Track cross-tenant access attempts
- Performance monitoring - Per-tenant metrics and limits
- Backup strategy - Tenant-specific or isolated backups
- Compliance ready - Easy data export/deletion per tenant
Conclusion
Multi-tenancy enables efficient SaaS applications serving multiple customers from a single codebase. Choose your isolation level based on compliance requirements and scaling needs. Start with single-database shared tables for simplicity, move to separate databases for strict isolation. Always implement defense in depth with global scopes, policies, and explicit tenant checks throughout your application.